[TOC]
1. 基础语法 1.1 引用运算 & 和 const 关键字 引用运算 & 引用是已有变量的别名,创建引用时不会分配新内存,而是直接操作原变量。引用的特性:
必须在定义时初始化。
一旦初始化,就和原变量绑定,不能重新绑定。
代码示例:
1 2 3 4 5 6 7 8 9 10 11 12 13 #include <iostream> using namespace std;int main () int a = 10 ; int &ref = a; cout << "a = " << a << ", ref = " << ref << endl; ref = 20 ; cout << "After modifying ref: a = " << a << ", ref = " << ref << endl; return 0 ; }
输出:
1
2
a = 10, ref = 10 After modifying ref: a = 20, ref = 20
常见应用:
函数传参: 引用作为函数参数可以避免值传递时的拷贝,提高效率。
1
2
3
4
5
6
7
8
9
10
void increment (int &n) n++; } int main () int x = 5 ; increment (x); cout << "x = " << x << endl; return 0 ; }
引用返回值: 引用可以作为函数返回值,允许函数返回原始变量的引用。
1
2
3
4
5
6
7
8
9
10
11
int & getReference (int &x) return x; } int main () int a = 10 ; int &ref = getReference (a); ref = 20 ; cout << "a = " << a << endl; return 0 ; }
const 关键字const可以修饰变量、函数参数、成员函数等,表示不可修改的属性。
修饰变量:
1
2
const int x = 10 ; x = 20 ;
修饰函数参数: 用const修饰函数参数,可以防止函数修改传入的值。
1
2
3
4
void display (const int &n) cout << "n = " << n << endl; }
对于类对象或结构体,通过引用传递避免拷贝开销,同时用 const 确保不会修改内容:
1
2
3
4
5
6
7
8
9
class MyClass {public : void display () const "MyClass display" << endl; } }; void showObject (const MyClass &obj) obj.display (); }
修饰指针:
指针本身不可修改:int *const ptr;
指针指向的值不可修改:const int *ptr;
代码示例:
1 2 3 4 5 6 7 8 cpp复制代码int main () const int a = 10 ; const int *ptr = &a; int b = 20 ; int *const constPtr = &b; return 0 ; }
1.2 内联函数 一言以蔽之,内联函数类似于宏定义
内联函数的定义: 内联函数是通过 inline 关键字声明的函数,目的是告诉编译器尽可能将该函数的代码插入到函数调用的位置,而不是通过正常的函数调用机制(如栈操作)来执行。通过这种方式,函数调用的开销可以被消除,从而提高程序的运行效率。
内联函数的优点:
避免函数调用开销 增强代码效率,适合频繁调用的小函数 减少函数调用栈开销
内联函数的语法: 内联函数的语法与普通函数唯一的区别是在函数前加上 inline 关键字。
1 2 3 4 5 6 7 8 9 10 11 #include <iostream> using namespace std;inline int square (int x) return x * x; } int main () cout << "Square of 5: " << square (5 ) << endl; return 0 ; }
在这个例子中,square 函数被声明为内联函数。inline 关键字告诉编译器尽可能将这个函数的代码直接插入到调用它的地方。
当程序运行时,编译器会将 square(5) 替换为 5 * 5,避免了调用函数的传统开销。
内联函数的使用场景: 内联函数最适合用于以下几种情况:
简单函数 :内联函数最适合那些计算量小、逻辑简单的函数。例如,单纯的数学运算、获取和设置变量值等。内联不会对大型、复杂的函数有显著的优化效果。频繁调用的函数 :对于需要频繁调用的短小函数,内联可以减少函数调用的时间和开销,尤其是在嵌套调用和循环中调用的函数。不涉及递归 :内联函数不适合递归函数,因为递归的每一次调用都涉及到不同的栈帧和参数,因此递归的内联展开会导致性能下降。避免大量栈操作的函数 :如果一个函数没有太多的局部变量,也没有复杂的逻辑,使用内联可以避免函数调用时产生的栈开销。
内联函数的限制:
不同编译器标准不同 inline 关键字声明函数并不意味着编译器一定会将其内联展开。编译器可能会基于函数的复杂性、调用频率、优化目标等因素决定是否进行内联展开。因此,内联函数只是对编译器的一个建议,而非强制要求。复杂函数不适合内联 递归函数不应内联
编译器如何决定内联展开:
对于小函数,编译器通常会自动进行内联优化,即使没有显式声明 inline。
对于较大的函数,编译器一般不会内联,因为内联会导致代码膨胀,增加 CPU 缓存的压力,反而可能带来性能下降。
编译器还可能根据一些编译选项、优化级别等决定是否内联。
内联与宏的比较: 内联函数有时可以替代宏(#define)来进行常见的计算,但它们之间有一些重要区别:
类型安全 :内联函数是强类型的,宏没有类型检查,容易引发隐式类型转换错误。调试友好 :内联函数可以被调试器追踪,而宏无法单步调试。作用域 :内联函数遵循正常的作用域规则,而宏在预处理阶段进行替换,可能引发作用域问题。
1 2 #define SQUARE(x) ((x) * (x)) inline int square (int x) return x * x; }
内联函数相较于宏有更强的类型检查和更好的可维护性。
1.3 函数参数缺省值 缺省参数的规则:
缺省值从右向左定义。(不能两边有缺省值,中间夹着一个正常的)
调用时可以省略有缺省值的参数。
代码示例: 1 2 3 4 5 6 7 8 9 10 11 12 13 #include <iostream> using namespace std;void greet (const char *name = "Guest" , int age = 18 ) cout << "Hello, " << name << "! Age: " << age << endl; } int main () greet (); greet ("Alice" ); greet ("Bob" , 25 ); return 0 ; }
输出:
1 2 3 Hello, Guest! Age: 18 Hello, Alice! Age: 18 Hello, Bob! Age: 25
1.4 输入输出 标准输入输出: 1 2 3 4 5 6 7 8 9 10 cpp复制代码#include <iostream> using namespace std;int main () int num; cout << "Enter a number: " ; cin >> num; cout << "You entered: " << num << endl; return 0 ; }
格式化输出: 1 2 #include <iomanip> cout << setprecision (2 ) << fixed << 3.14159 ;
二进制文件读写 写入二进制文件: 1 2 3 4 5 6 7 8 9 10 11 12 13 14 15 16 17 #include <fstream> using namespace std;struct Data { int id; char name[50 ]; }; int main () Data d = {1 , "Alice" }; ofstream outFile ("data.bin" , ios::binary) ; if (outFile) { outFile.write ((char *)&d, sizeof (d)); } outFile.close (); return 0 ; }
读取二进制文件: 1 2 3 4 5 6 7 ifstream inFile ("data.bin" , ios::binary) ;Data d; if (inFile) { inFile.read ((char *)&d, sizeof (d)); cout << "ID: " << d.id << ", Name: " << d.name << endl; } inFile.close ();
1.5 异常处理
异常的基本结构: 1 2 3 4 5 6 7 8 9 10 11 12 13 14 #include <iostream> #include <stdexcept> using namespace std;int main () try { int x = 0 ; if (x == 0 ) throw runtime_error ("Division by zero!" ); } catch (const runtime_error &e) { cout << "Caught exception: " << e.what () << endl; } return 0 ; }
输出:
1 Caught exception: Division by zero!
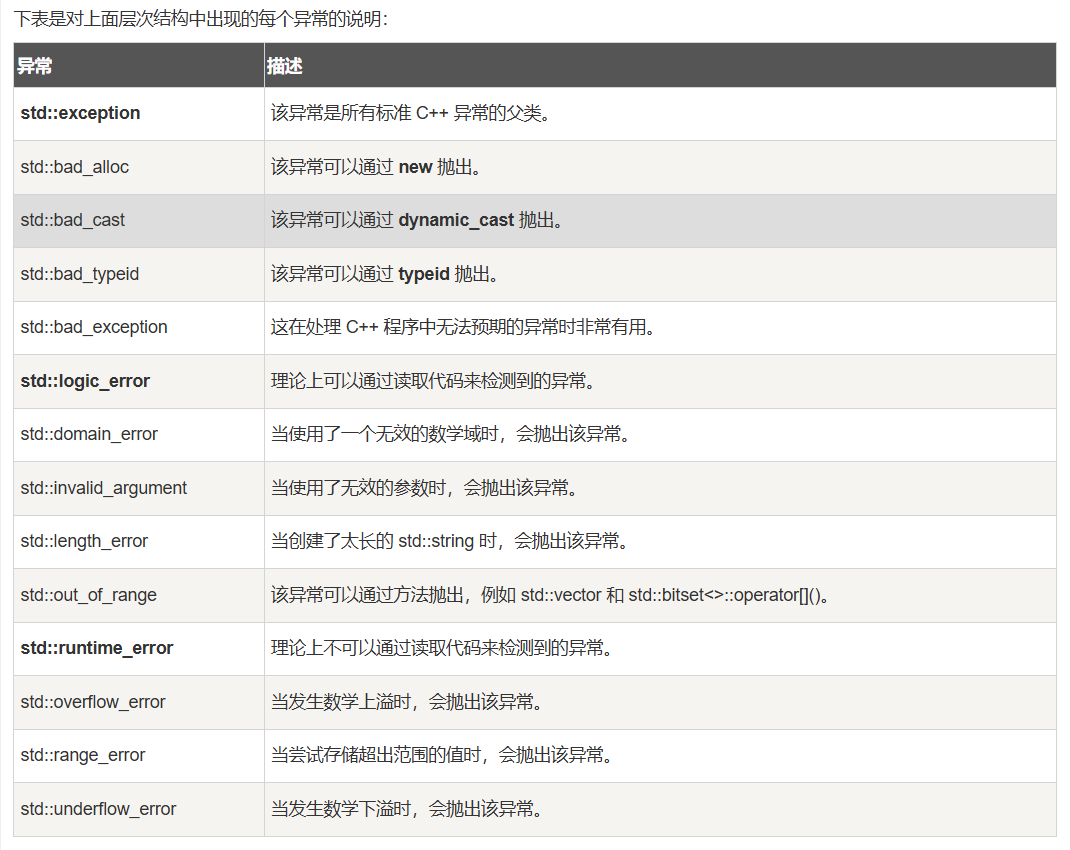
常见异常类型:
std::exception:所有异常的基类。std::runtime_error:运行时错误。std::invalid_argument:无效参数。
2. 类与对象 2.1 构造函数、复制构造函数、析构函数 构造函数 构造函数是类的特殊函数,在对象创建时自动调用,用于初始化对象。特点:
名字与类名相同,无返回值。
可以重载(支持多个构造函数)。
语法与示例:
1 2 3 4 5 6 7 8 9 10 11 12 13 14 15 16 17 18 19 20 21 22 23 24 #include <iostream> using namespace std;class MyClass {private : int value; public : MyClass (int v) { value = v; cout << "Constructor called, value = " << value << endl; } void display () cout << "Value: " << value << endl; } }; int main () MyClass obj1 (10 ) ; obj1. display (); return 0 ; }
输出:
1 2 Constructor called, value = 10 Value: 10
复制构造函数 复制构造函数用于通过已有对象创建新对象。语法:
1 ClassName (const ClassName &obj);
代码示例:
1 2 3 4 5 6 7 8 9 10 11 12 13 14 15 16 17 18 19 20 21 22 23 24 25 26 27 28 #include <iostream> using namespace std;class MyClass {private : int value; public : MyClass (int v) : value (v) {} MyClass (const MyClass &obj) { value = obj.value; cout << "Copy constructor called!" << endl; } void display () cout << "Value: " << value << endl; } }; int main () MyClass obj1 (10 ) ; MyClass obj2 = obj1; obj2. display (); return 0 ; }
输出:
1 2 Copy constructor called! Value: 10
析构函数 析构函数用于释放对象销毁时占用的资源。特点:
名字为类名前加 ~。
无参数、无返回值。
一个类只能有一个析构函数,不能重载 。
代码示例:
1 2 3 4 5 6 7 8 9 10 11 12 13 14 15 16 17 18 19 #include <iostream> using namespace std;class MyClass {public : MyClass () { cout << "Constructor called!" << endl; } ~MyClass () { cout << "Destructor called!" << endl; } }; int main () MyClass obj; cout << "Inside main function." << endl; return 0 ; }
输出:
1 2 3 Constructor called! Inside main function. Destructor called!
2.2 this 指针 this 是一个指针,指向调用成员函数的当前对象。常用于以下场景:
区分成员变量和局部变量同名的情况。
在链式调用中返回当前对象的引用。
代码示例:
1 2 3 4 5 6 7 8 9 10 11 12 13 14 15 16 17 18 19 20 21 22 23 24 25 26 27 #include <iostream> using namespace std;class MyClass {private : int value; public : MyClass (int value) { this ->value = value; } MyClass &setValue (int value) { this ->value = value; return *this ; } void display () cout << "Value: " << value << endl; } }; int main () MyClass obj (10 ) ; obj.setValue (20 ).display (); return 0 ; }
输出:
2.3 友元函数、静态成员变量、const 成员函数 友元函数 友元函数可以访问类的私有成员,通常用来实现特殊操作。语法:
1 friend ReturnType FunctionName (ClassName &obj)
代码示例:
1 2 3 4 5 6 7 8 9 10 11 12 13 14 15 16 17 18 19 20 21 22 23 24 #include <iostream> using namespace std;class MyClass {private : int value; public : MyClass (int v) : value (v) {} friend void display (const MyClass &obj) }; void display (const MyClass &obj) cout << "Value: " << obj.value << endl; } int main () MyClass obj (10 ) ; display (obj); return 0 ; }
输出:
静态成员变量 静态成员变量属于类而不是对象,所有对象共享一份。特点:
必须在类外初始化。
使用 ClassName::StaticMember 访问。
代码示例:
1 2 3 4 5 6 7 8 9 10 11 12 13 14 15 16 17 18 19 20 21 22 23 24 25 #include <iostream> using namespace std;class MyClass {private : static int count; public : MyClass () { count++; } static int getCount () return count; } }; int MyClass::count = 0 ;int main () MyClass obj1, obj2, obj3; cout << "Number of objects: " << MyClass::getCount () << endl; return 0 ; }
输出:
const 成员函数const 成员函数保证函数不会修改类的成员变量。语法:
1 ReturnType FunctionName () const ;
代码示例:
1 2 3 4 5 6 7 8 9 10 11 12 13 14 15 16 17 18 19 20 21 22 23 24 25 #include <iostream> using namespace std;class MyClass {private : int value; public : MyClass (int v) : value (v) {} int getValue () const return value; } void setValue (int v) value = v; } }; int main () const MyClass obj (10 ) cout << "Value: " << obj.getValue () << endl; return 0 ; }
输出:
2.4 数据封装与访问限定符 访问限定符
public:private:protected:
代码示例: 1 2 3 4 5 6 7 8 9 10 11 12 13 14 15 16 17 18 19 20 21 22 23 24 25 26 27 28 29 #include <iostream> using namespace std;class MyClass {private : int privateValue; public : int publicValue; protected : int protectedValue; public : MyClass () : privateValue (10 ), publicValue (20 ), protectedValue (30 ) {} void display () cout << "Private: " << privateValue << ", Public: " << publicValue << ", Protected: " << protectedValue << endl; } }; int main () MyClass obj; obj.publicValue = 50 ; obj.display (); return 0 ; }
输出:
1 Private: 10, Public: 50, Protected: 30
3. 运算符重载 运算符重载允许为用户自定义的类定义运算符的行为。注意:
不能重载 ::(作用域解析)、.(成员访问)等。
至少有一个操作数是用户定义类型。
3.1 类内运算符重载 运算符可以作为类的成员函数重载。语法:
1 ReturnType operatorSymbol (Arguments) ;
示例:重载 + 运算符 1 2 3 4 5 6 7 8 9 10 11 12 13 14 15 16 17 18 19 20 21 22 23 24 25 26 #include <iostream> using namespace std;class Complex {private : double real, imag; public : Complex (double r, double i) : real (r), imag (i) {} Complex operator +(const Complex &c) const { return Complex (real + c.real, imag + c.imag); } void display () const cout << real << " + " << imag << "i" << endl; } }; int main () Complex c1 (1.5 , 2.5 ) , c2 (2.0 , 3.0 ) ; Complex c3 = c1 + c2; c3. display (); return 0 ; }
输出:
3.2 类外运算符重载 类外定义运算符时需要将其声明为友元函数。语法:
1 friend ReturnType operatorSymbol (const ClassName &lhs, const ClassName &rhs)
示例:重载 << 运算符 1 2 3 4 5 6 7 8 9 10 11 12 13 14 15 16 17 18 19 20 21 22 23 24 25 #include <iostream> using namespace std;class Complex {private : double real, imag; public : Complex (double r, double i) : real (r), imag (i) {} friend ostream &operator <<(ostream &out, const Complex &c); }; ostream &operator <<(ostream &out, const Complex &c) { out << c.real << " + " << c.imag << "i" ; return out; } int main () Complex c1 (1.5 , 2.5 ) ; cout << "Complex number: " << c1 << endl; return 0 ; }
输出:
1 Complex number: 1.5 + 2.5 i
3.3 类内运算符重载和类外运算符重载的区别 1. 定义方式 类内运算符重载
定义位置: 在类的内部定义为类的成员函数。
调用方式: 隐式使用类的对象调用。
示例:
1 2 3 4 5 6 7 8 9 10 11 12 13 14 15 16 17 18 19 20 21 22 23 class MyClass {private : int value; public : MyClass (int v) : value (v) {} MyClass operator +(const MyClass &other) const { return MyClass (value + other.value); } void display () const cout << "Value: " << value << endl; } }; int main () MyClass a (10 ) , b (20 ) ; MyClass c = a + b; c.display (); return 0 ; }
类外运算符重载 2. 参数与调用区别 类内运算符重载 类外运算符重载 3. 访问权限 类内运算符重载
类内的成员函数可以直接访问类的 私有成员 和 保护成员 ,无需额外处理。
类外运算符重载 4. 功能范围 类内运算符重载
类内重载通常用于运算符的
左操作数
必须是类的对象,例如:
a + b 中,a 必须是类的对象。如果左操作数不是类的对象(如 3 + a),类内运算符无法直接处理。
类外运算符重载
类外重载可以处理更灵活的场景,比如:
左操作数是类对象时:a + b。
左操作数不是类对象时:3 + a。
示例:支持 3 + a 的类外重载:
1 2 3 4 5 6 7 8 9 10 11 12 13 14 15 16 17 18 19 20 class MyClass {private : int value; public : MyClass (int v) : value (v) {} friend MyClass operator +(int num, const MyClass &a); }; MyClass operator +(int num, const MyClass &a) { return MyClass (num + a.value); } int main () MyClass a (5 ) ; MyClass b = 3 + a; return 0 ; }
5. 代码设计与适用场景
比较维度 类内运算符重载 类外运算符重载
适用性 左操作数必须是类对象。
左操作数可以是类对象或其他类型。
访问权限 能直接访问类的私有或保护成员。
需要声明为友元函数才能访问私有成员。
代码风格 更紧密地绑定类本身,逻辑集中在类内。
功能更灵活,适合跨类或跨类型的操作符重载。
实现复杂度 较简单,适合常见的运算符重载。
适合需要更高灵活性的重载场景。
总结
类内运算符重载:
左操作数必须是类对象。
使用更简单,适合内部逻辑紧密绑定类的情况。
类外运算符重载:
左操作数可以是类对象,也可以是其他类型。
更灵活,适合需要处理跨类或多种数据类型操作的场景。
4. 多线程 多线程使程序可以同时运行多个任务,提高效率。C++11 提供了 std::thread 支持多线程。
4.1 创建线程 语法: 1 2 3 4 5 6 7 8 9 10 #include <thread> void function () } int main () std::thread t (function) ; t.join (); return 0 ; }
示例:简单线程创建 1 2 3 4 5 6 7 8 9 10 11 12 13 #include <iostream> #include <thread> using namespace std;void printMessage (const string &msg) cout << "Message: " << msg << endl; } int main () thread t1 (printMessage, "Hello from thread!" ) ; t1. join (); return 0 ; }
输出:
1 Message: Hello from thread!
4.2 多线程同步 为了避免多个线程同时修改共享资源,C++ 提供了互斥锁 (std::mutex)。
示例:使用互斥锁 1 2 3 4 5 6 7 8 9 10 11 12 13 14 15 16 17 18 19 20 21 22 23 #include <iostream> #include <thread> #include <mutex> using namespace std;mutex mtx; void printNumbers (int id) for (int i = 0 ; i < 5 ; ++i) { mtx.lock (); cout << "Thread " << id << ": " << i << endl; mtx.unlock (); } } int main () thread t1 (printNumbers, 1 ) ; thread t2 (printNumbers, 2 ) ; t1. join (); t2. join (); return 0 ; }
输出(线程顺序可能不同):
1 2 3 4 5 Thread 1 : 0 Thread 2 : 0 Thread 1 : 1 Thread 2 : 1 ...
高级的lock方式: 1. std::mutex 首先要了解的是 **std::mutex**,它是一个基本的互斥量,用于实现线程间的同步。在 C++11 中,std::mutex 提供了基本的加锁和解锁功能。
**std::mutex::lock()**:加锁。
**std::mutex::unlock()**:解锁。
1 2 3 4 5 6 7 8 9 #include <mutex> std::mutex mtx; void safeFunction () mtx.lock (); mtx.unlock (); }
尽管手动加锁和解锁是有效的,但它们需要小心处理,尤其是在异常发生时。如果发生异常而未能解锁互斥量,程序可能会进入死锁状态。因此,C++ 提供了 std::lock_guardstd::unique_lock
2. std::lock_guard std::lock_guard 是一个简单的封装,它用于在作用域内自动加锁,并且在作用域结束时自动解锁。它是一种 作用域锁 ,非常适合于只需要加锁并自动解锁的场景。
作用 :当 std::lock_guard 对象被创建时,它会自动加锁互斥量。当 std::lock_guard 对象超出作用域时,它会自动调用析构函数,进而解锁互斥量。优点 :避免手动解锁,降低死锁风险。
语法示例: 1 2 3 4 5 6 7 8 9 10 11 12 13 14 15 16 #include <iostream> #include <mutex> std::mutex mtx; void safeFunctionWithLockGuard () std::lock_guard<std::mutex> lk (mtx) ; std::cout << "Shared resource accessed with lock_guard\n" ; } int main () safeFunctionWithLockGuard (); return 0 ; }
在这个例子中:
当 lock_guard 对象 lk 被创建时,它会自动加锁互斥量 mtx。
当 lk 超出作用域(即 safeFunctionWithLockGuard 函数结束时),lk 会自动解锁 mtx。
std::lock_guard 的特点是简单且有效,但它不支持解锁或重新锁定操作,只适合于简单的加锁和解锁场景。
3. std::unique_lock std::unique_lock 是一个比 std::lock_guard 更加灵活的锁管理工具,它提供了比 std::lock_guard 更多的功能,包括:
可以显式地 手动解锁 。
支持 锁的延迟 (即在创建 unique_lock 对象时不立即加锁)。
可以 重新锁定 。
可以 转移锁的所有权 ,即将锁的所有权从一个 unique_lock 对象转移到另一个。
std::unique_lock 是 可移动的 ,而 std::lock_guard 不是。
语法示例: 1 2 3 4 5 6 7 8 9 10 11 12 13 14 15 16 17 18 19 20 21 #include <iostream> #include <mutex> std::mutex mtx; void safeFunctionWithUniqueLock () std::unique_lock<std::mutex> ul (mtx) ; std::cout << "Shared resource accessed with unique_lock\n" ; ul.unlock (); ul.lock (); std::cout << "Shared resource accessed after relocking\n" ; } int main () safeFunctionWithUniqueLock (); return 0 ; }
在这个例子中:
std::unique_lock 在创建时自动加锁互斥量 mtx。使用 ul.unlock() 手动解锁,之后可以执行一些不需要锁的操作。
ul.lock() 可以在之后重新加锁。当 unique_lock 对象 ul 超出作用域时,mtx 会自动解锁。
std::unique_lock 提供了比 std::lock_guard 更高的灵活性,但也相对复杂一些。它适用于需要更细粒度控制的场景,如需要手动解锁和重新加锁的情况。
4. std::lock 和 std::lock_guard 与 std::unique_lock 的区别
**std::lock_guard**:
简单,适用于无需手动解锁的场景。
自动加锁并在作用域结束时自动解锁。
不能显式解锁或重新加锁。
不能转移所有权。
**std::unique_lock**:
更灵活,适用于需要手动解锁、重新加锁、或转移锁所有权的场景。
支持显式解锁(unlock())和重新加锁(lock())。
支持锁的延迟和转移。
**std::mutex 和 std::lock**:
std::mutex 提供了基本的加锁和解锁机制。std::lock 是一个可以同时加锁多个互斥量的工具,可以防止死锁的发生。
5. 总结
std::lock_guardstd::unique_lockstd::lock_guardstd::unique_lock使用这些锁可以有效地避免死锁,减少编写线程安全代码时的复杂性。
5. STL(标准模板库) STL 提供了常用的数据结构和算法。以下是重点内容。
5.1 常用容器 5.1.1 vector 动态数组,支持随机访问和自动扩容。
示例:基本操作
1 2 3 4 5 6 7 8 9 10 11 12 13 14 #include <iostream> #include <vector> using namespace std;int main () vector<int > vec = {1 , 2 , 3 }; vec.push_back (4 ); vec.pop_back (); for (int x : vec) { cout << x << " " ; } return 0 ; }
输出:
5.1.2 queue 先进先出(FIFO)队列。
示例:基本操作
1 2 3 4 5 6 7 8 9 10 11 12 13 14 #include <iostream> #include <queue> using namespace std; int main() { queue<int> q; q.push(1); q.push(2); q.push(3); while (!q.empty()) { cout << q.front() << " "; // 获取队头元素 q.pop(); // 移除队头元素 } return 0; }
输出:
5.1.3 deque 双端队列,可以从两端插入或删除。
示例:基本操作
1 2 3 4 5 6 7 8 9 10 11 12 13 14 #include <iostream> #include <deque> using namespace std;int main () deque<int > dq = {1 , 2 , 3 }; dq.push_front (0 ); dq.push_back (4 ); for (int x : dq) { cout << x << " " ; } return 0 ; }
输出:
记录代码 1 2 3 4 5 6 7 8 9 10 11 12 13 14 15 16 17 18 19 20 21 22 23 24 25 26 27 28 29 30 31 32 33 34 35 36 37 38 39 40 41 42 43 44 45 46 47 48 49 50 51 52 53 54 55 56 57 58 59 60 61 62 63 64 65 66 67 68 69 70 71 72 73 74 75 76 77 78 79 80 81 82 83 84 85 86 87 88 89 90 91 92 93 94 95 96 97 98 99 100 101 102 103 104 105 106 107 108 109 110 111 112 113 114 115 116 117 118 119 120 121 122 123 124 125 126 127 128 129 130 131 132 133 134 135 136 137 #include <iostream> #include <vector> #include <set> #include <map> #include <stack> #include <queue> #include <unordered_map> #include <unordered_set> using namespace std; int main () vector <int > v1; vector <int > v2 (10 ); vector <int > v3 (10 ,2 ); v3. resize (12 ); for (int i = 0 ;i <12 ;i++) { cout<<v3[i]<<" " ; } cout<<endl; for (auto p =v3. begin ();p!=v3. end ();p++) { cout<<*p<<" " ; } cout<<endl; set <int > my_set; my_set.insert (8 ); my_set.insert (2 ); my_set.insert (5 ); my_set.insert (12 ); for (auto p = my_set.begin ();p!=my_set.end ();p++) { cout<<*p<<" " ; } cout<<endl; auto p = my_set.find (8 ); cout<<"*p is " <<*p<<endl; my_set.erase (5 ); for (auto p = my_set.begin ();p!=my_set.end ();p++) { cout<<*p<<" " ; } map<int ,string> m; m[2 ] ="hello" ; m[1 ] = "wrold" ; for (auto p = m.begin ();p!=m.end ();p++) { cout << (*p).first <<":" <<p->second<<" " ; } map<string,int > m2; m2["hello" ] = 9 ; m2["wrold" ] = 3 ; for (auto p = m.begin ();p!=m.end ();p++) { cout << (*p).first <<":" <<p->second<<" " ; } stack <int > mystack; mystack.push (4 ); mystack.push (3 ); mystack.push (1 ); mystack.pop (); cout<<mystack.top ()<<endl; cout<<mystack.size ()<<endl; queue <int > q; q.push (2 ); q.push (4 ); q.push (6 ); q.push (-1 ); q.push (3 ); q.pop (); cout<<q.front ()<<" " <<q.back ()<<endl; unordered_map<string,int > hashtable; hashtable["apple" ] = 10 ; hashtable["banana" ] = 4 ; hashtable["pear" ] = 6 ; for (auto p = hashtable.begin ();p!=hashtable.end ();p++) { cout<<p->first<<" " <<p->second<<endl; } unordered_set<int > mySet; mySet.insert (10 ); mySet.insert (20 ); mySet.insert (30 ); mySet.insert (10 ); if (mySet.find (20 ) != mySet.end ()) { cout << "20 is in the set." << endl; } for (const int & num : mySet) { cout << num << " " ; } system ("pause" ); return 0 ; }
5.2 算法库 5.2.1 std::sort 排序容器中的元素。
示例:
1 2 3 4 5 6 7 8 9 10 11 12 13 14 #include <iostream> #include <algorithm> #include <vector> using namespace std;int main () vector<int > vec = {3 , 1 , 4 , 1 , 5 }; sort (vec.begin (), vec.end ()); for (int x : vec) { cout << x << " " ; } return 0 ; }
输出:
5.3 C++11 新特性 5.3.1 auto 关键字 自动推断变量类型。
1 2 auto x = 10 ; auto y = 3.14 ;
5.3.2 Lambda 表达式c 定义匿名函数的方式,适合轻量级操作。
语法:
1 [捕获列表](参数列表) -> 返回类型 { 函数体 }
示例:
1 2 3 4 5 6 7 8 9 10 11 12 13 #include <iostream> #include <algorithm> #include <vector> using namespace std;int main () vector<int > vec = {1 , 2 , 3 , 4 , 5 }; int sum = 0 ; for_each(vec.begin (), vec.end (), [&sum](int x) { sum += x; }); cout << "Sum: " << sum << endl; return 0 ; }
输出: